Loyaltek 8210
Mobile terminal, operates via GPRS or Wi-Fi. With receipt printer and touchscreen
The model and type are always displayed on the front of the terminal. All terminals use the C-tap protocol (= payment software). So please be particularly attentive to the type of terminal you have before starting.
Installation
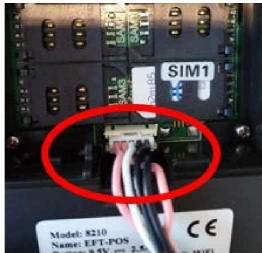
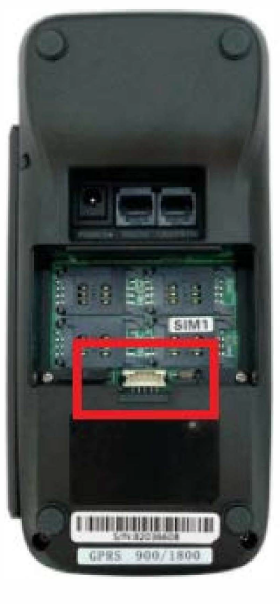
To power on the terminal, insert the white battery plug at the back (open the cover) of the terminal. Insert the battery in the designated place. (See the photos)
How to charge?
Insert the charger at the back of the terminal module, to the left where 1, there is "POWER" written.
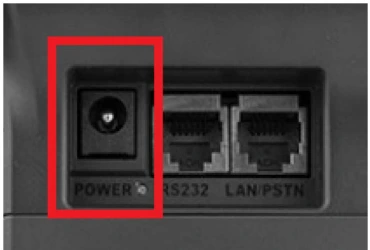
CHECKING : A red light will illuminate on the left side of the terminal.
When the battery is fully charged, this light will turn green.
When the battery is fully charged, this light will turn green.
Standby mode
To save energy, the terminal often goes into standby mode. This is a black screen.
To exit standby mode :
-> Tap the screen to wake the device from standby.
You can also press any key to wake the device from sleep mode. Here you might continue, for example, on the menu.
To avoid problems, always press the up or down arrow.
To exit standby mode :
-> Tap the screen to wake the device from standby.
You can also press any key to wake the device from sleep mode. Here you might continue, for example, on the menu.
To avoid problems, always press the up or down arrow.
How to change the paper roll?
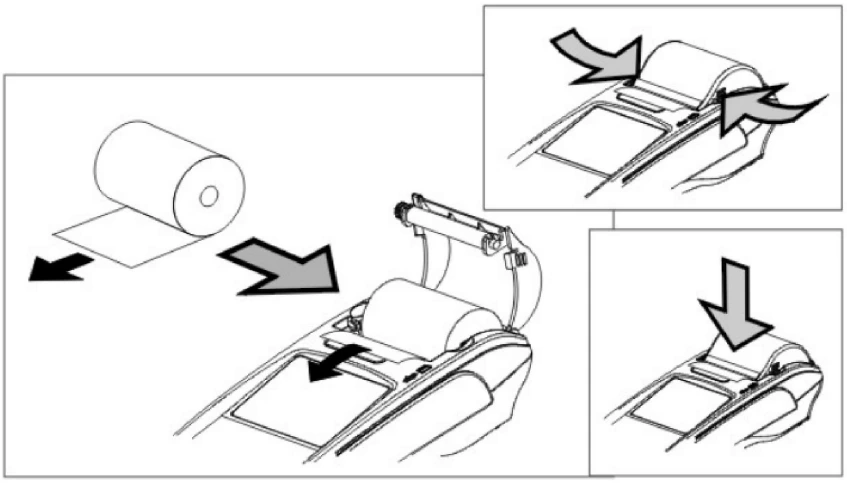
1. Place the roll
2. Stretch the roll
3. Press firmly on the cover to close it
How to start or turn off the device?

To start the terminal :
-> Press the button
-> Release the button (otherwise the terminal will turn off)
The operating system starts. As soon as "Read card" is displayed on the screen, the terminal is ready
until you hear 2 long "beeps"

To turn off the terminal :
-> Press the button
The terminal turns off completely.
for a few seconds until "Power OFF" is displayed on the screen.
Special keys:
Either the arrows
then ENTER

Cancel/back
Select :
ENTER Confirm
ALPHA Correct typos
CANCEL Cancel/back
Common keys :
How to use the terminal keyboard?
MENU
FUNC Access the Transactions menu
ALPHA
FUNC Access the Transactions menu
ALPHA
How to connect the terminal to the Wifi network?
Start the terminal.
As soon as "START ..." appears on the screen
-> Press ALPHA immediately
-> When you are on the screen "Enter Admin PW", Enter the code 999
-> Press [3] "Network Settings"
-> Press [1] "Wifi"
-> Press [2] "Wifi Configuration"
-> Press [1] "Scan AP"
-> Select your Wifi network from the list that appears
-> If prompted, enter the password for your Wifi network
The keyboard allows you to enter numbers. It is possible to change them to uppercase and lowercase by pressing
ALPHA one or more times.
-> Press ENTER
-> Once finished, exit the menu by pressing CANCEL
The terminal should then connect using your Wifi network
As soon as "START ..." appears on the screen
-> Press ALPHA immediately
-> When you are on the screen "Enter Admin PW", Enter the code 999
-> Press [3] "Network Settings"
-> Press [1] "Wifi"
-> Press [2] "Wifi Configuration"
-> Press [1] "Scan AP"
-> Select your Wifi network from the list that appears
-> If prompted, enter the password for your Wifi network
The keyboard allows you to enter numbers. It is possible to change them to uppercase and lowercase by pressing
ALPHA one or more times.
-> Press ENTER
-> Once finished, exit the menu by pressing CANCEL
The terminal should then connect using your Wifi network
Fallback Mode?
The Loyaltek 8210 Wifi/GPRS/LAN terminal can operate either with Wifi or with the GPRS network or over Ethernet according to the following modes:
. Ethernet : the terminal will only operate with the internal network via an Ethernet cable
. Wifi only: the terminal will only work with the Wifi network
. GPRS only: the terminal will only work with the GPRS network
The Wifi-GPRS-Ethernet, GPRS-Wifi-Ethernet, Ethernet-GPRS-Wifi modes require a SIM card to be present in the device!
To change the mode, use the following procedure:
-> Start the terminal
-> As soon as "START" appears on the screen, press the key ALPHA immediately.
-> Enter the password "999" when you are on the Enter Admin PW screen.
-> Press [3] "Network Settings"
-> Press [3] "Fallback Mode"
-> Select the required mode from the menu and press ENTER to confirm
. Ethernet : the terminal will only operate with the internal network via an Ethernet cable
. Wifi only: the terminal will only work with the Wifi network
. GPRS only: the terminal will only work with the GPRS network
The Wifi-GPRS-Ethernet, GPRS-Wifi-Ethernet, Ethernet-GPRS-Wifi modes require a SIM card to be present in the device!
To change the mode, use the following procedure:
-> Start the terminal
-> As soon as "START" appears on the screen, press the key ALPHA immediately.
-> Enter the password "999" when you are on the Enter Admin PW screen.
-> Press [3] "Network Settings"
-> Press [3] "Fallback Mode"
-> Select the required mode from the menu and press ENTER to confirm
. How to make a payment?
-> Enter the amount in Euro cents on the terminal then press ENTER
-> Read card is displayed on the screen with the amount.
-> The customer inserts their card after reading the amount and enters their PIN.
-> "One moment please"
-> The ticket is printed
A ticket is printed, whether a transaction is accepted or not.
For more information on the ticket (see below)
-> If you wish to cancel a sale, you must do so in the presence of the customer within one hour of the sale and by following
-> Read card is displayed on the screen with the amount.
-> The customer inserts their card after reading the amount and enters their PIN.
-> "One moment please"
-> The ticket is printed
A ticket is printed, whether a transaction is accepted or not.
For more information on the ticket (see below)
-> If you wish to cancel a sale, you must do so in the presence of the customer within one hour of the sale and by following
. How to cancel a sale?
If you wish to cancel a sale, you must do so in the presence of the customer within the hour following the sale and by following these steps :
-> press FUNC
-> select "Cancel.sale" with the arrow, ENTER
-> Enter the amount (cents) that you want to cancel.
AUTH.CODE appears on the terminal screen
-> enter the 6 digits of the authorisation code found on the receipt (under the date), ENTER
The customer inserts their card and you have "accepted" displayed on the terminal screen.
A confirmation ticket is printed.
-> press FUNC
-> select "Cancel.sale" with the arrow, ENTER
-> Enter the amount (cents) that you want to cancel.
AUTH.CODE appears on the terminal screen
-> enter the 6 digits of the authorisation code found on the receipt (under the date), ENTER
The customer inserts their card and you have "accepted" displayed on the terminal screen.
A confirmation ticket is printed.
. Print a copy of the ticket for the customer ?
The screen displays :
. yes ENTER
. no CLEAR
. yes ENTER
. no CLEAR
. Ticket information
If a transaction is accepted ?
"Accepted" is displayed on the screen. On the ticket :
. "AUTH. CODE XXXXXX" under the date.
. "Accepted " at the bottom of the ticket.
Press ENTER to print a copy for the customer.
If a transaction is refused ?
"Refused " is displayed on the screen.
A ticket is still printed :
. There is no authorisation code.
. "Refused " at the bottom of the ticket.
"Accepted" is displayed on the screen. On the ticket :
. "AUTH. CODE XXXXXX" under the date.
. "Accepted " at the bottom of the ticket.
Press ENTER to print a copy for the customer.
If a transaction is refused ?
"Refused " is displayed on the screen.
A ticket is still printed :
. There is no authorisation code.
. "Refused " at the bottom of the ticket.
. Ticket information
You may need to reprint a ticket, This operation must be done just after the sale, here is how to do it :
Customer ticket : How to reprint a customer ticket
Access the menu by pressing the key FUNC of the terminal.
. Select [2] "Customer ticket" to reprint a copy of the customer ticket.
. A ticket is printed
. Select [2] "Customer ticket" to reprint a copy of the customer ticket.
. A ticket is printed
Print trans log : Sales reports and totals
-> Press the key MENU
-> Press [2] "Administration" and press ENTER
-> Enter the password with the last 4 digits of the terminal's serial number, then press
ENTER
-> Select [5] "Print trans log"
This option can be used to request a daily total of current sales and the last 3 days.
You can choose from these 4 different options :
. Condensed: Here, you get less information on the daily total, but a better overview
can be obtained.
-> Press ENTER , specify the date and time at the start of the report.
-> Press ENTER , specify the date and time
-> at the end of press ENTER (The printer will print now)
. Full info: All the info of today's transactions and previous days will be available. Here, for
example, failed transactions are also included.
-> Specify the date and time at the beginning of the report, press ENTER
-> Specify the date and time at the end of the report and press ENTER (The printer
will print now)
. Only totals: The terminal will only display the totals of transactions for the defined days.
-> Specify the date and time at the beginning of the report, press ENTER
-> Specify the date and time at the end of the report and press ENTER (The printer
will print now)
. Totals + cards: Here you have an overview by card type (VISA, MAESTRO, ... ) and its number of
sales.
-> Specify the date and time at the beginning of the report, press ENTER
-> Specify the date and time at the end of the report and press ENTER
(The printer will print now)
*If you wish to go back during an operation press CANCEL
-> Press [2] "Administration" and press ENTER
-> Enter the password with the last 4 digits of the terminal's serial number, then press
ENTER
-> Select [5] "Print trans log"
This option can be used to request a daily total of current sales and the last 3 days.
You can choose from these 4 different options :
. Condensed: Here, you get less information on the daily total, but a better overview
can be obtained.
-> Press ENTER , specify the date and time at the start of the report.
-> Press ENTER , specify the date and time
-> at the end of press ENTER (The printer will print now)
. Full info: All the info of today's transactions and previous days will be available. Here, for
example, failed transactions are also included.
-> Specify the date and time at the beginning of the report, press ENTER
-> Specify the date and time at the end of the report and press ENTER (The printer
will print now)
. Only totals: The terminal will only display the totals of transactions for the defined days.
-> Specify the date and time at the beginning of the report, press ENTER
-> Specify the date and time at the end of the report and press ENTER (The printer
will print now)
. Totals + cards: Here you have an overview by card type (VISA, MAESTRO, ... ) and its number of
sales.
-> Specify the date and time at the beginning of the report, press ENTER
-> Specify the date and time at the end of the report and press ENTER
(The printer will print now)
*If you wish to go back during an operation press CANCEL
What to do when a payment is declined?
. The card is damaged, the chip is unreadable
1. Clean the card and try again.
2. Ask the customer to contact their bank.
1. Clean the card and try again.
2. Ask the customer to contact their bank.
. The connection is poor or the signal is weak
1. Check the signal strength (minimum 2 bars).
2. Turn off and on the Internet router (and wait 2 minutes).
1. Check the signal strength (minimum 2 bars).
2. Turn off and on the Internet router (and wait 2 minutes).
. Insufficient funds on the card
=> Ask the customer to contact their bank.
=> Ask the customer to contact their bank.
. Fraud
=> The card used is blacklisted
=> The card used is blacklisted
. Explanation to give to the customer
=> "There is an issue with your card, please contact your bank"
=> "There is an issue with your card, please contact your bank"
Screen problem?
. Black screen:
The terminal screen goes into sleep mode after 1 minute to save energy, the terminal often goes into sleep mode. This is a black screen.
-> Tap the terminal screen to exit sleep mode
-> Turn off the terminal with the button for a few seconds until "POWER OFF" is displayed on the screen. The terminal completely shuts down.
-> Restart the terminal by pressing the button POWER until you hear a "beep"
The terminal screen goes into sleep mode after 1 minute to save energy, the terminal often goes into sleep mode. This is a black screen.
-> Tap the terminal screen to exit sleep mode
-> Turn off the terminal with the button for a few seconds until "POWER OFF" is displayed on the screen. The terminal completely shuts down.
-> Restart the terminal by pressing the button POWER until you hear a "beep"
The printer is not printing?
. Ensure that the dimensions of the paper roll are respected (57x40x12)
. The small wheel is damaged
. The printer lid is not properly closed
. Is the roll coming to its end? The paper will therefore show vertical colour lines
. The direction of the paper roll.
. The small wheel is damaged
. The printer lid is not properly closed
. Is the roll coming to its end? The paper will therefore show vertical colour lines
. The direction of the paper roll.
Is 'Out of service' displayed on the terminal?
Perform the operation TML to refresh the settings or to update the settings.
-> Access the menu by pressing the key MENU
-> In the main menu press [2] "Administration", press ENTER
-> Enter the password with the last 4 digits of the terminal's serial number, press ENTER
-> Select [2] "Administration", press ENTER
-> Enter the Admin password (the last 4 digits of the 8-digit serial number of the terminal), you are in the Admin menu.
-> Select [2] "TML Initialisation" and then press ENTER
Wait a moment until you return to the "approved successfully" screen.
If you have TML on the fourth line in the Administration Menu, this means you have a cold message.
You will first need to delete this error message.
-> Access the menu by pressing the key MENU
-> In the main menu press [2] "Administration", press ENTER
-> Enter the password with the last 4 digits of the terminal's serial number, press ENTER
-> Select [2] "Administration", press ENTER
-> Enter the Admin password (the last 4 digits of the 8-digit serial number of the terminal), you are in the Admin menu.
-> Select [2] "TML Initialisation" and then press ENTER
Wait a moment until you return to the "approved successfully" screen.
If you have TML on the fourth line in the Administration Menu, this means you have a cold message.
You will first need to delete this error message.
Erase cold message?
-> Démarrer le terminal
-> Dès que "START ..." apparait à l'écran appuyez sur ALPHA immediately
-> Enter the code "999" when you are on the "Enter Admin PW" screen
-> Press "Erase cold message"
-> Press ENTER to delete
-> Then restart the terminal
-> Perform a TML operation to refresh the settings
-> Dès que "START ..." apparait à l'écran appuyez sur ALPHA immediately
-> Enter the code "999" when you are on the "Enter Admin PW" screen
-> Press "Erase cold message"
-> Press ENTER to delete
-> Then restart the terminal
-> Perform a TML operation to refresh the settings