Loyaltek 9220
Mobile terminal, operates via GPRS or Wi-Fi. With receipt printer and touchscreen
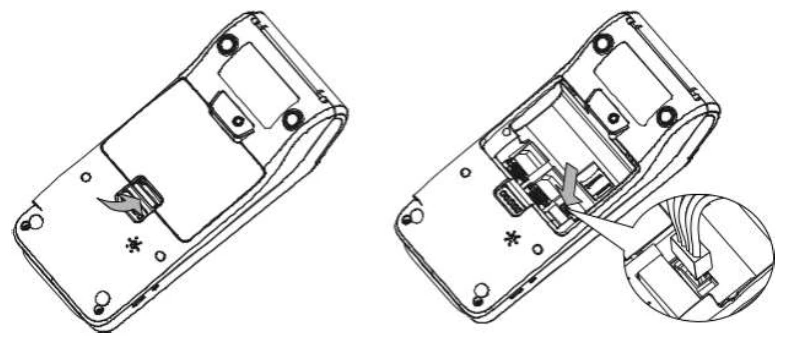
Insert the battery into the white socket provided for this purpose.
It is located at the back (open the cover) of the terminal.
Insert the Battery
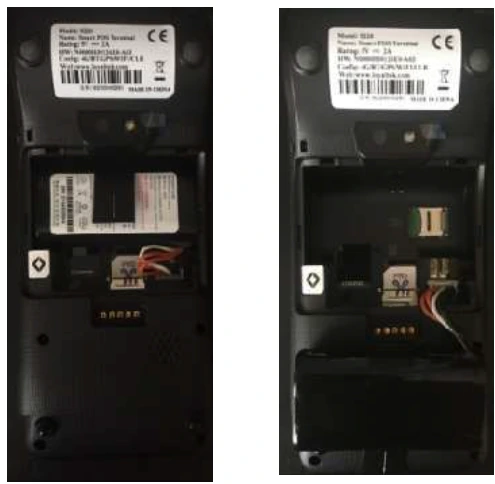
Roll Replacement
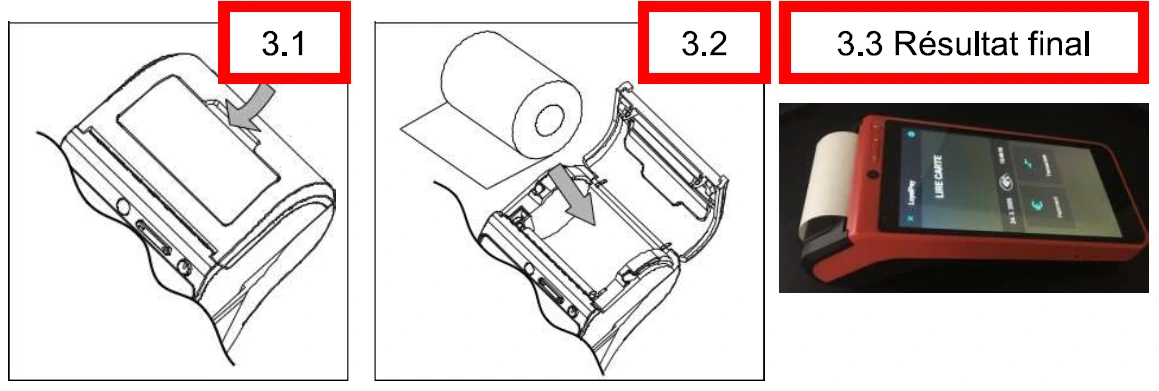
3.1) Open the cover
3.2) Place the roll and stretch it.
3.3) Press firmly on the
cover to close it and here is the result obtained.
Launch the LoyalPay payment application
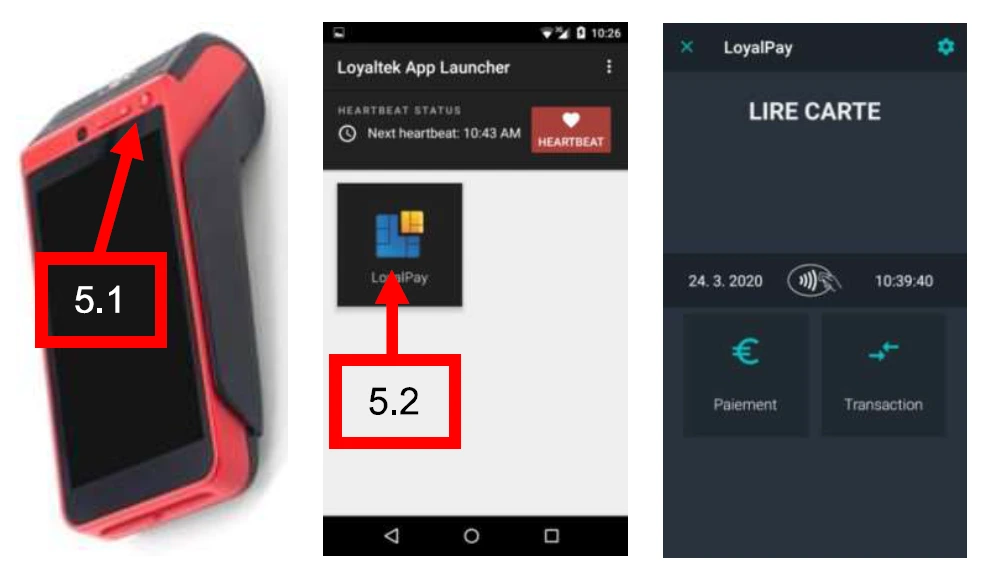
5.1) Press and hold the "Power"
button for a few seconds until you hear the first "beep".
The operating system will start.
The power button is located above the screen of the
terminal.
5.2) Press the LoyalPay icon to start the payment application
. Once it has started, "Read Card"
appears on the screen, this means that your terminal is
ready for use.
Launch the LoyalPay payment application
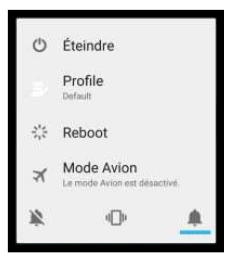
Press and hold the "Power" button for a few seconds until a menu appears on the screen.
Select the first option "Shut down".
The device will completely shut down.
*Shortcut to enable or disable airplane mode point: "Enable or disable the mode
airplane".
Set up the device with SIM card and Change the APN
1. Inserting the SIM card
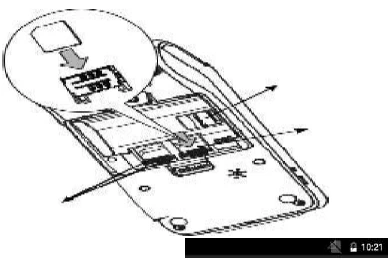
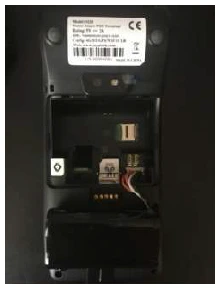
Slide the SIM card into the device at the SIM slot located
on the back of the device.
Turn off or restart the device for it to recognise the SIM card.
In the top right corner, the icon

2. Change the APN
To modify the APN :
-> Click on the icon┇
-> Click on "Other apps"
-> Select "Settings"
-> Click on "┅ More"
-> Click on "Mobile networks"
-> Click on "Access Point Names"
-> Choose "Proximus Internet"
-> Select APN
-> Modify the default APN internet.proximus.be to standard.m2mmobi.be, click on OK
To return to the main screen for the payment application, press 8x◄, located to the left of the menu bar at the bottom of the screen.
If the menu bar has disappeared, swipe your finger up on the screen to make it reappear.
NOTE : In the tab "data usage", the button must always be active, regardless of the mode of
operation WIFI or SIM card
Set up the device in WIFI on its Internet connection
To set up the device in WIFI:
-> Click on the Icon┇
-> Click on "Other apps"
-> Select "Settings"
-> Click on Wi-Fi, and swipe to "enabled"
-> Select a network from the list of available Wi-Fi networks
Touch the icon┇(Add a network) to manually add a network
If the network is secured by a password, you must enter the password to continue. Once the connection is successful, the screen displays "Connected" under the name of the selected network.
To save battery, disable the Wi-Fi function when it is not in use.
Change the language in the Settings menu:
To change the language :
-> Click on the icon┇
-> Click on "Other apps"
-> Select "Settings"
-> Swipe your finger on the screen until you reach "Language and input"
-> Click on "Language"
-> Select your preferred language
Make a sale
Launch the LoyalPay application.
If your terminal is ready to use you will have "Read Card" written at the top of the screen
-> Press "Payment"
-> Enter the amount using the numeric keypad.
NOTE : The terminal operates in € cents.
For example, for 1€ you must enter "100"
-> Press "OK", to confirm the amount
The terminal will prompt you to finalise the sale: "Read card"
Chip sale :
-> Access the Payment menu with "Read Card"
-> insert the card into the chip card reader.
-> Enter the PIN code, press ENTER
To make a contactless payment:
-> Access the Payment menu with "Read Card"
-> Place the customer's card on the contactless reader located at the paper tray of the payment terminal
and the terminal will proceed with a transaction.
If necessary, enter the PIN code, press ENTER
Once the payment is approved, you can also provide the customer with proof of payment:
. If OK = YES, press "OK"
. If STOP = NO, press "STOP"
NOTE : The cards Bancontact are "Dual Brands".
They are Bancontact and Maestro at the same time. Transaction fees may differ between Maestro
Bancontact. The choice is therefore left to the merchant to follow one or the other scheme.
If during a Bancontact payment you click on "Not OK", the terminal will allow you to choose between
Bancontact and Maestro.
Manual Sale :
-> Access the Payment menu with "Read Card"
-> Press Manual PAN
A window opens and invites you to:
=> Enter the payment card number now.
=> Enter the expiry date of your card
Activate or deactivate flight mode
Flight mode is a setting on your payment terminal that allows you to simultaneously disable cellular, WIFI, and Bluetooth connections on your device.
When this mode is activated, a symbol representing an airplane appears in the upper right corner next to the battery icon.
Here are the steps to activate or deactivate it on the payment terminal:
-> Click on the Icon┇
-> Click on "Other apps"
-> Select "Settings"
-> Select "┅ More"
-> Slide the Airplane mode to activate or deactivate it.
*A shortcut for the function exists in the section: Launch the LoyalPay payment application at the top of the page
Transaction Menu
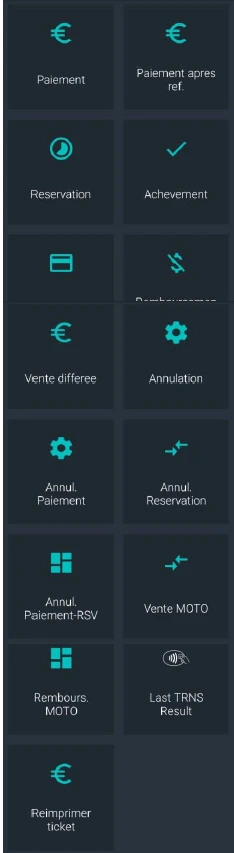
Payment :
This option allows for an electronic payment (see more details in "4. Make a sale")
Payment after ref.
Reservation
Reservations must be authorised by the acquirer to be operational on the terminal. The aim is to carry out a transaction that will block (reserve) a defined amount on the cardholder's account for a certain period. After this period, the reserved amount is refunded to the cardholder.
Completion
This option is only active for the Paynovate acquirer
Card control
Card control allows you to verify the validity of the electronic payment card
Refund
The customer's refund is processed without requesting an authorisation code.
Deferred sale
Cancellation
The cancellation of the payment is carried out without an authorisation code.
Annul.paiement
The cancellation of the payment is done with a very specific authorisation code found on the payment receipt
Cancel.Reservation
The cancellation of the reservation is done
Annul.Paiement-RSV
The cancellation of the Completion transaction is done.
MOTOR Sale / Refund.MOTOR
This option is used by companies that make sales by mail or by phone
Reprint receipt
This option prints a second receipt related to the last transaction
. An authorisation code ("AUTH CODE")
This is indicated on the proof of payment
. To enter the Admin password
The PASSWORD of the Admin menu is made up of the last 4 digits of the S/N serial number of your
terminal located on the label at the back of the terminal.
Main Menu of the LoyalPay application
. The Administration
. The Configuration
To access the main menu:
-> Launch the LoyalPay application by clicking on it
-> Enter the Admin menu
-> Enter the password using the numeric keypad
The PASSWORD of the Admin Menu. is made up of the last 4 digits of the SN serial number of your terminal located on the label at the back of the terminal.
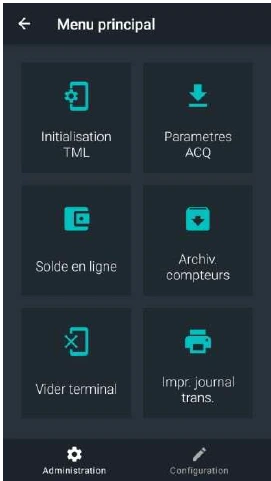
Initialisation TML :
To begin with, you have the option to perform a "TML (terminal) initialisation". This is a parameterisation operation. This is used to force the update of recently modified parameters in the TMS.
ACQ Parameters
Thanks to this manipulation, we obtain information about the payment systems used by card acceptance companies (acquirer). This option can be used if more information is required for an error message.
Online balance
This option concerns technicians.
Archiving Counters
This option concerns technicians.
Empty the terminal
This tool is intended when the terminal of the card acceptance company changes. It is a kind of reset. Therefore, it is not recommended to use this tool.
Print Transaction Log.
This option can be used to request a daily total of sales, for both current and past days.
1. Main Menu "Administration Section"
2. Main Menu "Configuration Section"
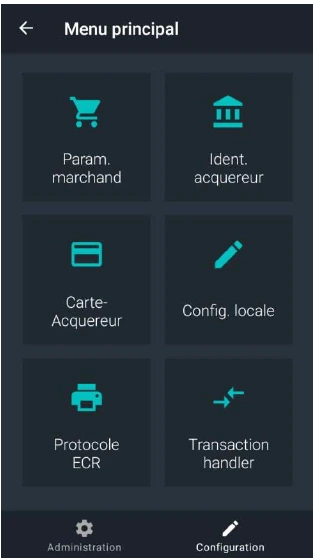
Merchant Parameters
You can choose to display the company data, change the language of the LoyalPay payment application
Acquirer ID
This tool is useful for knowing "the ID (identity)" of "the acquirer (TID)"
Card - Acquirer
Here you can see the cards that can be used. The "MID (merchant identifier)" can be viewed here by card type. The merchant identifier is also called "Unique Identifier (UID)"
Local config
With this option, it is possible to modify many things. Firstly, it is recommended to print everything in order to know where the desired changes should be applied. After that, you can adjust what needs to be modified
ECR Protocol
This option concerns technicians.
Transaction handler
This option concerns technicians.
Local Configuration Menu
1. Transactions Section
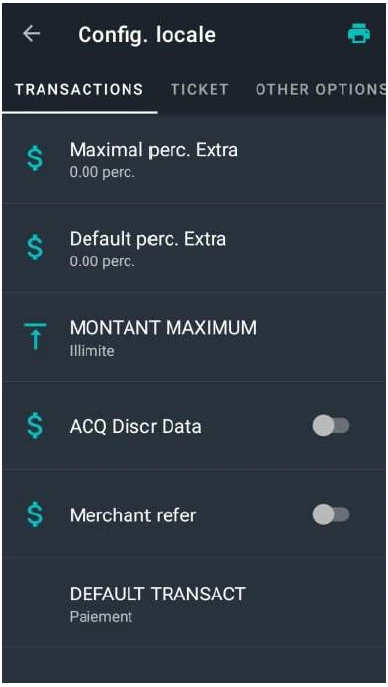
Maximum percentage for extras
If a tip is entered, the reseller can choose the maximum percentage. This must be approved by the card acceptance company (acquirer)
Default perc. Extra
This option concerns technicians.
Maximum total amount
Maximum total amount can be entered here, which can be a transaction
ACQ Data
If a card contains both eco vouchers and meal vouchers, and the merchant can receive both, then it must be chosen whether the money comes from the eco vouchers or the meal vouchers. If this option is enabled, the merchant will have the choice between the different types of vouchers for each of their transactions.
Merchant reference
You can choose to add a reference to the payment. This reference can be found in the overview sent daily/weekly/monthly
DEFAULT TRANSACT
This option concerns technicians.
2. Ticket Section
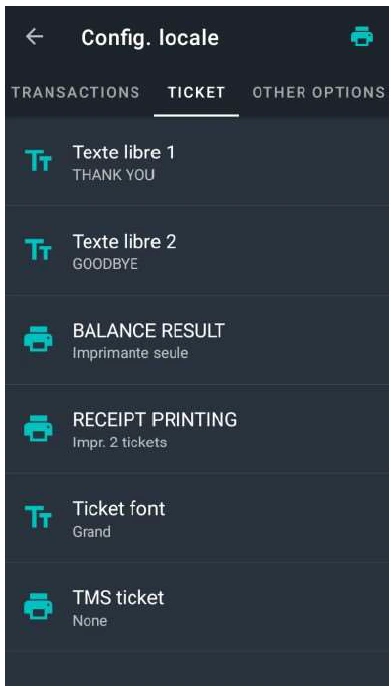
Free text 1
This is fixed and cannot be changed, "THANK YOU"
Free text 2
This text is also fixed and cannot be modified, "GOODBYE"
BALANCE RESULT
This option concerns technicians.
RECEIPT PRINTING
Here you can choose how many tickets should be printed. A printed payment receipt is very important in case of a dispute. It is recommended to keep both a ticket for the customer and a ticket for yourself. Sometimes the card acceptance company (acquirer) may ask you to print proof of payment.
Ticket font
You can choose a large or small font with the ticket.
It is recommended to take the large font.
TMS ticket
This option concerns technicians.
3. Other options Section
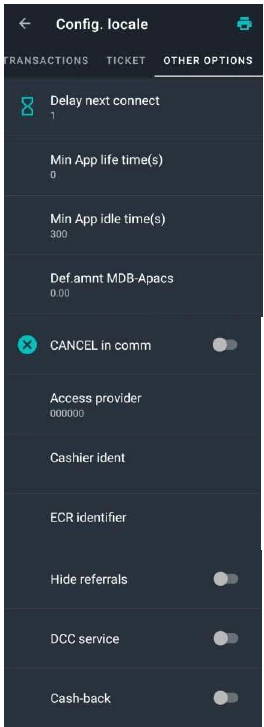
All of these options are performed by technicians.
Delay next connect
Technical option
Min App life time(s)
Technical option
Min App idle time(s)
Technical option
Def.amnt MDB-Apacs
Technical option
CANCEL in comm
Technical option
Access provider
Technical option
Cashier ident
Technical option
ECR Identifier
Technical option
Hide referrals
Technical option
DCC service
With this option, the terminal can make payments in the customer's currency. This function is executed by the card acceptance company (Acquirer).
Cash-back
Technical option
What to do in case of "Out of Service"
A refresh of the settings is necessary:
-> In the LoyalPay application, click on the gear to enter the Admin menu
-> Enter the password using the numeric keypad and then validate
The PASSWORD of the Admin MDP menu consists of the last 4 digits of the serial number SN of your terminal
located on the label at the back of the terminal
-> Press Delete if "Cold messages" is present at the top of the Main Menu screen
-> Press OK
-> Press OK
-> Perform "TML Initialisation"
After that, the terminal needs time to retrieve the settings.
As soon as the configuration is complete, you can exit the TML initialisation by pressing OK
If the message "FAILURE DURING TMS COMM." appears, the procedure is as follows:
Terminal with SIM Card :
-> Check the APN (see: "Configure the device with SIM card and Change the APN" )
Check : "Data consumption" this must always be active regardless of the WIFI or card operation
SIM
Terminal with WIFI:
-> Check your WIFI connection (see : "Set up the device in WIFI on its Internet connection" )
Check : "Data consumption" this must always be active regardless of the WIFI or card operation
SIM
-> Check if the serial number SN of the payment terminal is present in the TMS
-> Perform the "TML Initialisation"
Transaction report :
The day after the sale, you will receive a transaction report from LoyalTek (reports@loyaltek.com).
Two days later, you will receive a report of the payments that have been made to you.
LoyalTek Support :
Please contact us :
- by email : info@excell-pay.com
- by phone : +32 494 66 31
For each support request, please mention the serial number of your terminal (located on the back of the device, under the barcode and starting with SN