Ingenico Move5000
Mobile terminal, operates via GPRS or Wi-Fi. With receipt printer and touchscreen
The model and type are always displayed on the front of the terminal. All terminals use the C-tap protocol (= payment software). So please be particularly attentive to the type of terminal you have before starting.
CONNECTION
or simply "no network connection".
You can see if the terminal is connected by the network icon at the top left of the screen (on a DESK), and the signal strength with a GPRS or WiFi connection.
In both cases, the icon should display in green and indicate sufficient range (preferably full - see the signal strength bars).
Please note that with a LAN/WiFi connection, the network icon indicates that the device is connected to the modem. This does not mean it has access to the outside (firewall).
If your terminal is equipped with a "link up" and you want to test the connection, simply start a TMS session and see if it opens. If the icon is white, check that the network cable is properly connected and reset the terminal by turning it off and then back on.
Otherwise, have it check/re-establish the connection. By default, terminals are set to a dynamic IP.

GPRS signal icon
The connection becomes critical if there are only 2 bars

Wi-Fi signal icon
Please also pay attention to the signal strength.

Both icons are visible
The terminal is both GPRS and WiFi
Warning! One of the two is inactive, they do not work at the same time. See the Tech menu
SET UP THE TERMINAL CONNECTION
. GPRS
Press the grey
-> Tech Menu
-> Settings Menu
-> the password is 2009, confirm with OK.
-> Select the network, change OK. Always select C-TAP with SSL.
The terminal is now properly connected.
Ensure that the PIN code is disabled on the SIM card.
Press the grey
-> Tech Menu
-> Settings Menu
-> the password is 2009, confirm with OK (The terminal now displays the name of the current APN)
-> Enter the name of the APN and confirm with OK.
-> Enter the username of the APN and confirm with OK.
-> Enter the password of the APN and confirm with OK.
If it indicates a failure, carefully check the entered data and try again. Make sure to enter uppercase, lowercase, and numbers correctly.
SET THE TERMINAL TO 3G OR 2G
Press the grey menu key
-> Control panel, the password is 24377, and confirm with OK.
Then go to terminal settings
-> Communication means
-> Mobile network and scroll down to select set network type. (The terminal is set by
default to ‘4G/3G/2G auto’)
-> Select 2G or 3G only and confirm with OK.
-> Use the STOP key to exit the menu.
-> Then restart the terminal.
. WIFI
-> Tech Menu
-> Settings Menu
-> the password is 2009, confirm with OK
-> WiFi Settings. The terminal now displays the current SSID.
-> Scan the network and confirm with OK. Press the appropriate access point on the screen.
-> Enter the password and confirm with OK. (Unfortunately, the terminal does not display a
error message in case of failure)
Make sure to enter uppercase, lowercase, and numbers correctly.
You can also check the connection data via:
-> menu key
-> information menu
-> Ethernet info
EDIT THE ACCESS POINT (with the same name and password)
-> password: 24377, OK
-> terminal settings
-> wifi
-> advanced options
-> my networks.
Then restart the terminal.
SET UP THE TERMINAL CONNECTION
FAULTS AND SOLUTIONS
. INTERRUPTION / ERROR CODE -1
Check if the terminal is connected (see the signal/network icon at the top left of the screen; it
must be green and the WiFi or GPRS coverage must be sufficient). Reset the terminal by turning it off and then back on. Also check that the screen is properly off to ensure that
the power has been cut. After restarting, the terminal automatically opens a TMS session. Check if it opens correctly. Also recheck the network/signal icon on the screen. If the TMS session is open, proceed with the client to a test transaction of 1 cent to check if the terminal is working again. If you are not sure that the TMS session is open,
restart it manually.
Press the grey
-> Tech Menu
-> TMS Session
The terminal should then indicate on the screen "TMS session OK" if the session is open.
If the network/WiFi icon is green, but no connection can be established.
This is likely a network issue. The client can then (at their own risk) reset their modem, possibly change it if available, and then reset the terminal again.
If the network icon is still green, try to start a TMS session or a test transaction to see if you can connect. Also ensure that the ports are open on the network (see the port diagram).
If the network/WiFi icon is white.
Check the connection. Is the network cable properly connected? Check the network settings of the terminal. Is there an internet/WiFi connection at your location? If the terminal is properly connected, reset it by turning it off and then back on.
GPRS Connection.
Is the signal strength sufficient (at least 2 bars out of 5) and is the signal icon green? If not, move to a location where the signal is full and perform a soft reset using the keys.
Hold down the keys [yellow correction] and [dot] simultaneously for a few seconds, then release them. The terminal will turn off, after which you can turn it back on using the key [green OK].
The GPRS connection shows a white icon and no provider name appears on the screen.
The terminal does not recognise the SIM card. Ensure that the SIM card is properly inserted into the terminal (SIM slot 1). Power off the terminal and the SIM card, reinsert the SIM card into the terminal and power the terminal back on. Important: do not touch the SIM card when the terminal is powered on. You risk causing a short circuit, which could damage the SIM card slot or the card itself.
TRANSACTION DECLINED
-> C-TAP
-> Menu Service
-> enter the password, confirm with OK
If it fails again, perform a key load or a parameter download to view the error message on the screen.
. Key Loading
-> C-TAP
-> Menu Acquirer
-> the password is 2009, confirm with OK
-> select the ID* of the relevant acquirer on the terminal screen (if there are multiple) and confirm with OK.
Be attentive to any error messages on the screen.
. Invalid Card
-> C-TAP
-> Acquirer Menu
-> the password is 2009, confirm with OK
-> select the relevant acquirer and confirm with OK. The terminal will then download the parameters.
Be attentive to any error messages on the screen.
Therefore, insist that customers carefully check their connection.
. DOWNLOAD OF SETTINGS
PRINTER PROBLEMS
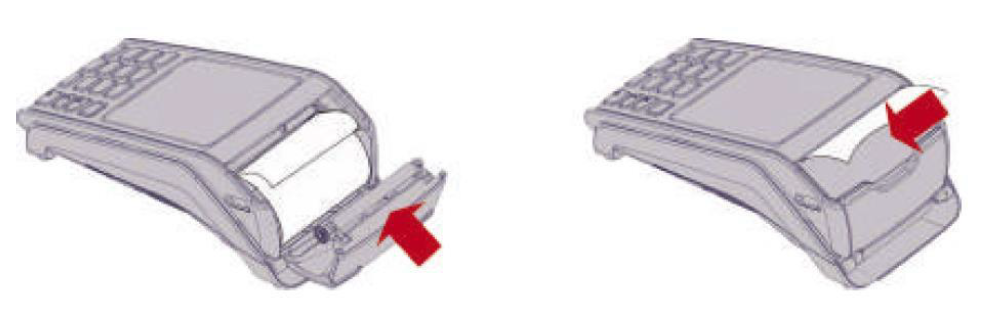
This is usually due to the roll being placed upside down in the terminal or that you are not using paper
thermal. You can easily check this: by scratching the paper with your nail, on the printer side, you should see black stripes appear.
See the illustration below for how to place the roll.
Check that the terminal is connected to the correct power supply.
The terminal does not print, the paper does not advance, but you hear that the printer is working (paper feed). Check that the paper is properly in place and that it slightly protrudes when the cover is closed.
Press the [F key] to advance the paper. If this still does not work , open the printer cover, then check if the gear is still attached to the rubber roll, and if the rubber feed roll is still attached to the cover. These parts can sometimes come loose due to negligence.
. Printing a duplicate receipt (one for the customer and one for the merchant)
in the example below, then press « submit » pour enregistrer la configuration. Faites
ensuite une session TMS sur le terminal pour mettre la modification à jour.
. Print a single receipt (if only one is needed)
COPY OF A RECEIPT
you can reprint the last transaction using the function « Receipt copy ». Press [F4]
on the screen, then receipt copy.
SCREEN ISSUES
C'est généralement parce que le terminal n'est pas alimenté.
Vérifiez qu'il soit correctement raccordé à l'alimentation électrique ou à la batterie. Vérifiez
soigneusement le câblage et l'alimentation. Sur l'alimentation d'un terminal Desk 5000, une LED
verte s'allume lorsqu'il est sous tension.
L'écran du terminal ne répond pas du tout. Le terminal est alors bloqué. Réinitialisez-le en l'éteignant puis en le rallumant.
L'écran tactile réagit mal ? Recalibrez l'écran.
Appuyez sur la touche grise
-> Control panel
-> the password is 24377, confirm with OK
-> Terminal settings
-> Human interface
-> Calibrate touch
-> follow the on-screen instructions.
After recalibrating, you can use the red stop button from the menu.
SCREEN ISSUES
-> Control Panel (confirm with OK)
-> Password = 24377 and confirm with OK.
-> Terminal settings (confirm with OK)
-> Eco mode (confirm with OK)
-> Screensaver time out, enter a value between 10 and 9999 seconds and confirm with OK.
Use the STOP key to exit the menu.
THE TERMINAL RESTARTS SPONTANEOUSLY
This restart should occur once a night between 3 and 5 o'clock.
Menu key grey
-> control panel
-> password = 24377 then OK
-> terminal settings
-> general settings
PCI V4 time slot, enabled (do not modify, must be set to « enabled » !), set begin time (default 3:30), set end time (default 5:00). The terminal will therefore perform a mandatory restart at that time.
If the settings are not correct, modify them, otherwise the terminal will randomly restart once a day.
TOTALS MENU
Press F4 on the screen
-> select Print totals X. The terminal then prints a receipt of the totals.
TOTAL Z (is a grand total, the counter resets to zero)
Press F4 on the screen
-> select Print totals Z. The terminal then prints a grand total and resets the counter to zero.
Therefore, you must print a TOTAL Z at the end of the day. Once printed, the data is cleared and you cannot reprint it.
.THE TOTALS DO NOT MATCH [FAULT]
WARNING! Start by printing a receipt of the totals, as this operation will also clear the current totals.
Press the grey
-> C-TAP
-> Service Menu
-> enter the service password, confirm with OK
-> Clear C-TAP DB.
TRANSACTION MENU
This operation only works if the asset is included in the acquirer's contract. Options such as data entry and reservations are also possible, provided that your contract allows them (only possible in certain sectors such as hospitality and travel). The activation of this feature must also be requested from Ingenico's support desk. A procedure is in place for this purpose.
GLOSSARY
Acquirer = host and transaction processing agent. Equens, EMS, CCV and Worldline are examples of acquirers in the Netherlands.
Terminal ID (TID) = also called BAC, ATM code, Ctap number or till number. It is a unique code specific to each terminal. The TID is linked to the contract number (merchant identifier) for the relevant brands. Each acquirer uses their own TIDs. Therefore, it is not possible to have two terminals with the same TID, otherwise there is a conflict.
Merchant ID (MID) = also called Merchant User ID (UID) or contract number. The designation may vary depending on the brand (type of card). A contract number is linked to a terminal identifier so that you can accept the relevant brand.
Brand = type of card. Examples: Maestro, Vpay, Mastercard, Visa, Amex.